Reviewed · ADRENALINE & ADVENTURE
Auckland Harbour Bridge Climb & Bungy Combo
This is not just a view. It’s an up-close way to meet Auckland’s most famous bridge. I love the fully guided flow, with stories and landmark pointers as you move through the bridge’s special access routes, and you’ll also like the included photo and video package that helps you relive the jump without juggling a phone.
The combo is a solid buy at about $194 per person for a 3-hour experience, especially because you’re doing the bridge and the bungy in one go. One thing to plan for: you can’t bring cameras or mobile phones onto the bridge, since your guide handles the filming.
In This Review
- Key Points You’ll Care About
- What Makes This Combo Different: Bridge Walkways Plus the Ocean-Touch Bungy
- Arriving, Checking In, and Getting Fitted for the Bridge
- Exclusive Bridge Time: Walkways Over, Under, Around, Up, and Over
- A practical consideration
- Westhaven Marina to the Summit: How the Route Feels in Motion
- The Bungy Pod at 40 Metres: Your Jump Options and Comfort Choices
- One more practical note
- Photos and Video Included: How to Get the Shots You Actually Want
- Price and Value at $194: What You’re Really Paying For
- Who This Suits Best (and Who Should Skip It)
- Booking Smart: Timing, Timing, Timing
- Should You Book This Auckland Combo?
- FAQ
- How long is the Auckland Harbour Bridge Climb and Bungy Combo?
- How much does it cost?
- Is it a small group tour?
- What’s included in the experience?
- Do I need transport arranged?
- What should I wear or bring?
- Can I bring a camera or phone on the bridge?
- What are the key age, height, and weight limits?
Key Points You’ll Care About
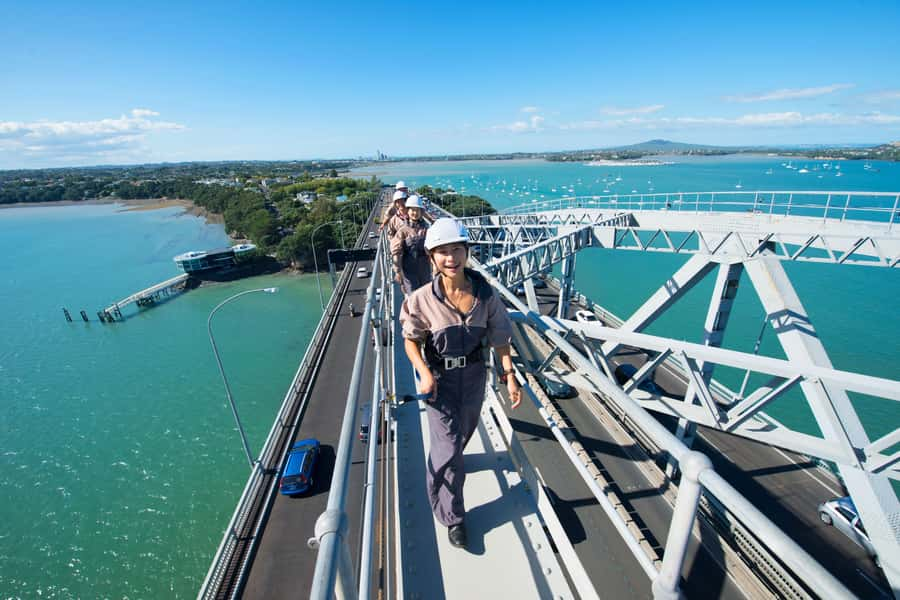
- Exclusive walkways on the Auckland Harbour Bridge keep you moving in places most people never see
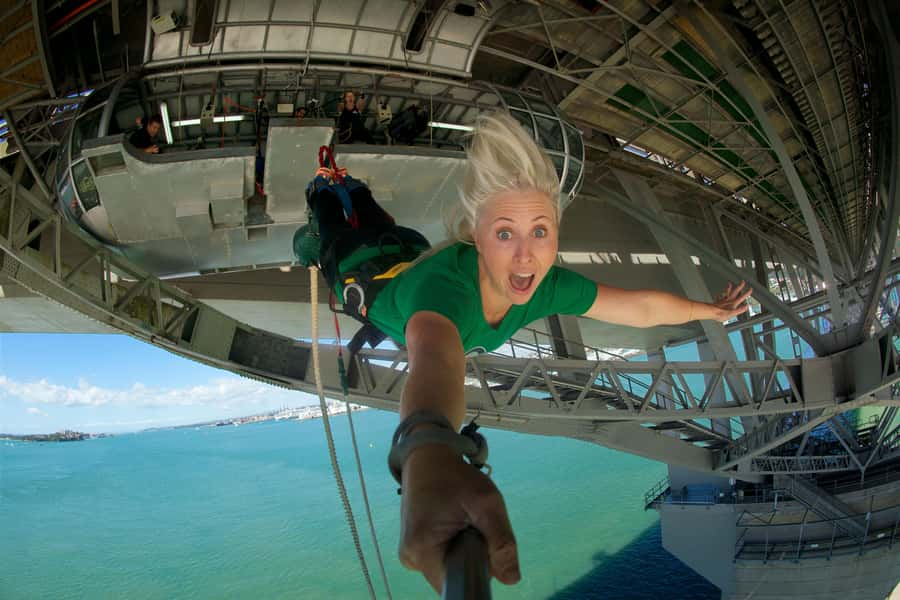
- Only ocean-touch bungy in New Zealand, with the chance to step out at the 40-metre Bungy Pod
- Small group capped at 6 participants, so you get real attention during safety and photo moments
- Photos and video included, captured on a latest iPhone and delivered at the end of the experience
- Suitable for a wide range of fitness levels, because it’s a guided walk while you stay clipped into the rail system
What Makes This Combo Different: Bridge Walkways Plus the Ocean-Touch Bungy
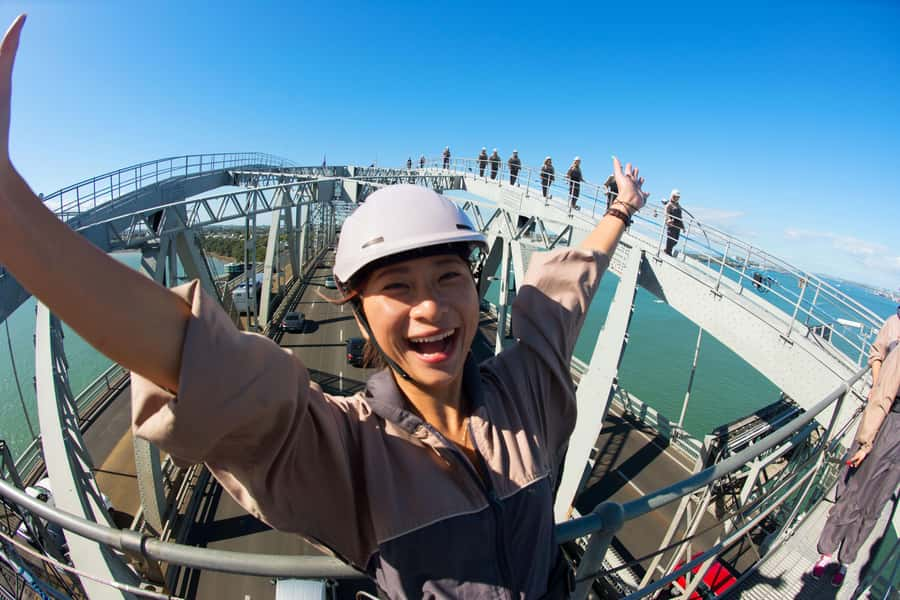
If you like the idea of Auckland from high places, this experience gives you more than a quick lookout stop. You get a guided bridge climb through parts of the Harbour Bridge that feel structured and story-led, then you top it off with a jump that’s designed to be part of New Zealand bungy history.
The standout combo point is the bungy itself. The jump happens from the Bungy Pod 40 metres above the water, and it’s described as New Zealand’s only ocean-touch bungy. That “touch the water” possibility changes the mental math for many people. Even if you’re not trying to be fearless, you’re not just jumping into empty air.
A second value driver: you’re not doing this solo. With a small group (up to 6), your guide can keep track of timing, safety, and comfort as you make your way through the experience.
More adrenaline around Auckland if you dare
- Waiheke Island: Zipline and Native Forest Adventure Trip
★ 4.9 · 695 reviews - Auckland: 13000, 16000, or 18000-Foot Tandem Skydive
★ 4.9 · 151 reviews - 2 Hour Surf Lesson – Te Arai Beach
★ 5.0 · 119 reviews - Jet Ski Hire Auckland – Experience the Fun with the Best Operator
★ 5.0 · 62 reviews
Arriving, Checking In, and Getting Fitted for the Bridge
Plan to arrive with a calm head. Check-in happens 15 minutes before your scheduled booking time, and you’ll want that extra buffer so you’re not rushing through footwear checks and safety instructions.
Once you’re checked in, the team will kit you out in overalls and safety equipment. That matters because it removes a lot of uncertainty. You don’t have to figure out how the system works; you’ll be taught how you’ll be secured before you head out.
For what to wear, keep it simple:
- Closed-toe shoes only (lace-up enclosed footwear)
- Skip sandals, flip flops, and high-heeled shoes
- Wear comfortable clothing, since you’ll be suited up in the provided bridge climb gear
Also, bring your body facts. There are clear limits: minimum 35 kilograms and maximum 150 kilograms, plus minimum age 10 years and minimum height 120 cm. If you’re traveling with kids, note that children 14 and under must be accompanied by an adult.
Exclusive Bridge Time: Walkways Over, Under, Around, Up, and Over
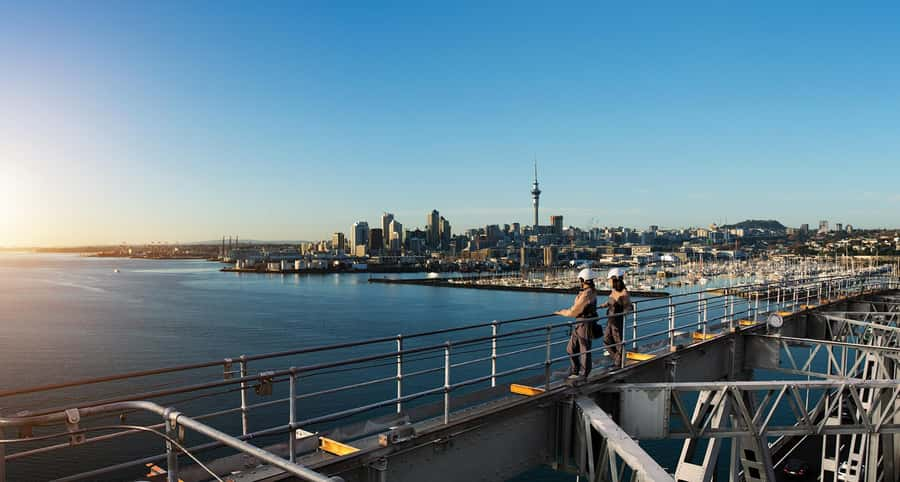
This is where the Harbour Bridge stops being a landmark and starts being a route. You’ll move through the bridge’s exclusive walkways, described as going over the water, under, around, up, and over again. It’s not just a single staircase and a single platform moment; it’s a guided circuit that keeps your attention on what’s ahead.
The “easy going walk” part isn’t marketing fluff. Your comfort comes from being safely clipped into the rail system while you walk. That setup turns what could feel like a full-on scramble into a controlled experience: you can focus on your footing and on what your guide is pointing out.
Along the way, your guide shares insights into Auckland’s history, culture, and landmarks. You’ll also be shown key Auckland sights as you go, so the climb feels like a moving story rather than just tall views. That’s a big reason a guided tour is worth it here: you get context for the city while you’re literally walking on an icon.
A practical consideration
No cameras or phones on the bridge means your mindset has to adjust. If you’re the kind of person who wants to document every step, you’ll need to trust the process and let your guide handle the capture. The experience is built around that, and it keeps things safer and smoother.
Westhaven Marina to the Summit: How the Route Feels in Motion
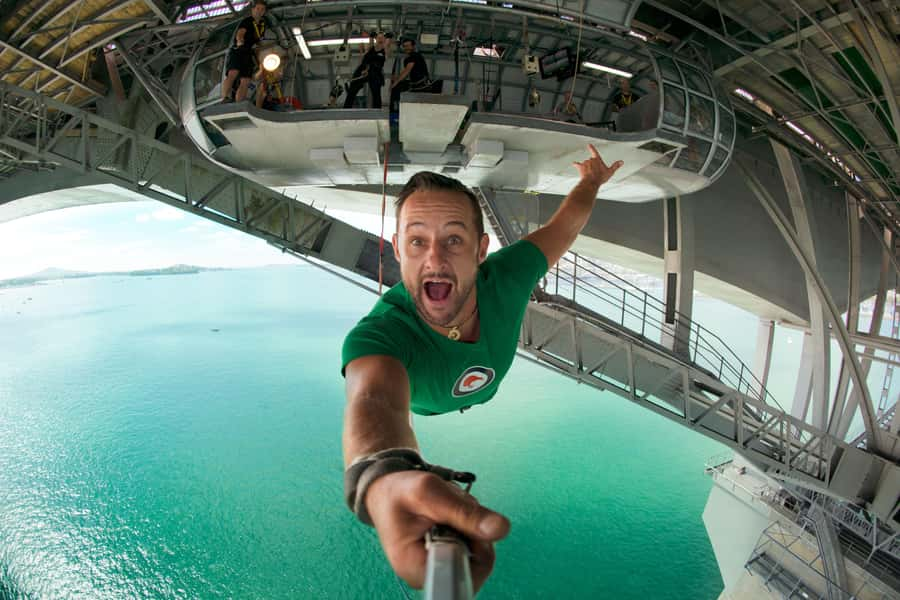
The experience references the Bungy Bach at Westhaven Marina, which is where your tour moves into the bungy portion flow. From there, the route connects you into the bridge access walkways above and around the water.
What I like about this kind of combined movement is that it reduces the “travel gap” feeling. Instead of doing the bridge and then going somewhere else later in a separate day-plan, the tour keeps one rhythm. That can matter if you have limited time in Auckland.
Also, the small-group setup helps here. When you’re grouped with up to 6 people, it’s easier for the team to keep everyone together at check points, for example when you transition toward the summit area.
The Bungy Pod at 40 Metres: Your Jump Options and Comfort Choices
Now for the part that most people remember. The tour stops at the Bungy Pod, at 40 metres above the water. This is where you get the moment to step out of your comfort zone with professional support.
There’s an important detail: it’s not just one rigid jump option. You can ask to touch the water, and you may be able to do second jumps with discounted rates. That flexibility is useful if you want to build confidence. Do the main jump first, then decide if you want another shot once you’ve felt the system, the setup, and the drop from the pod.
The experience also frames bungy as part of New Zealand’s history through AJ Hackett Bungy New Zealand. Even if you’ve only seen bungy on TV, the way the tour references that legacy can make the jump feel like more than a thrill. It feels like an event with roots.
And yes, your guide is there during the whole arc. You’re already clipped into the rail system during the bridge walk, and the jump itself is guided with the safety equipment process already explained earlier. That reduces the guesswork right when nerves kick in.
One more practical note
Since your phone and camera stay off the bridge, your best “you moment” strategy is mental. You’re not documenting from your own device during the height part. Instead, you let the team do the photos and video, and you stay present for the jump. It’s not as limiting as it sounds once you’re suited up and focused.
Photos and Video Included: How to Get the Shots You Actually Want
This is one of the best “hidden” values in the combo. Your guide captures photos and video throughout the experience on a latest iPhone. You then get the photos and video package included at the end, with no extra cost mentioned.
That matters because it solves a common problem with attractions at height: your attempts to film yourself can make you miss the feeling. Here, the setup encourages safety and presence. You don’t have to hold gear, manage angles, or worry about shaking footage during the height steps.
Also, since there are strict rules about bringing devices onto the bridge, you should assume the tour is built to capture everything that matters. Your job is to show up with the right footwear and comfortable clothes, then let the filming happen.
Tip: wear clothes that you’ll be happy seeing in photos. You’ll be in a bridge climb suit and safety equipment, so comfort matters more than fashion. But you can still choose something you’ll like in a photo afterward.
Price and Value at $194: What You’re Really Paying For
At $194 per person for about 3 hours, you’re not buying just a bungy jump or just a bridge photo moment. You’re paying for:
- A fully guided bridge climb through exclusive access routes
- Safety equipment and a climb suit included
- The ocean-touch bungy at the 40-metre pod
- An included photos and video package
- A small group experience (up to 6)
When you look at it that way, the price is easier to justify. The photo/video part alone often costs money in other thrill activities, and here it’s included. And the fully guided, exclusive access aspect reduces your need for guesswork, which saves stress even if you don’t “feel” the value until the day-of.
You can also request round-trip transfers from Sky Tower Auckland, but it’s “upon request” and subject to availability. The listing says transport can be included free of charge upon request, subject to availability, but you should still plan to double-check when you book so you’re not banking on it.
Who This Suits Best (and Who Should Skip It)
This combo fits best if you want a guided thrill that mixes city storytelling with a real height challenge.
You’ll likely enjoy it if:
- You’re comfortable with the idea of stepping into a harnessed, guided system
- You want more than a single photo stop, and you like guided explanations of what you’re seeing
- You want Auckland history and landmarks discussed while you’re on the bridge
It’s not suitable for:
- Children under 10
- Pregnant women past the first trimester (pregnancy status is assessed case-by-case, but the rule given is no participation past the first trimester)
- People outside the weight limits (under 35 kg or over 150 kg)
- People under 120 cm height
- Anyone using high-heeled shoes, sandals, or flip flops (the footwear rule is strict)
One more “real life” fit note: the experience is described as an easy-going walk, suitable for a wide range of ages and fitness levels, but it still involves standing at height and doing the jump component. If you’re unsure about the bungy part, know that your guide will be there and you’ll already have the system explained before you reach the pod.
Booking Smart: Timing, Timing, Timing
This experience runs on a 3-hour duration window and check-in happens 15 minutes before your scheduled start time. That means you’ll want to protect that block in your Auckland plan.
If you’re staying near Sky Tower, the optional transfer can help you keep the day simple. If you’re not, you’ll need to sort transport yourself, or request transfers when booking.
Also, plan your clothing day. Wear something comfortable that won’t be ruined by a full day with safety gear. And remember: no cameras or phones on the bridge. If you’re hoping to record on your own, reconsider before you show up.
Should You Book This Auckland Combo?
I’d book it if you want the smartest way to experience two Auckland icons in one guided session: the Harbour Bridge and an ocean-touch bungy from 40 metres. The combination of exclusive bridge access, a small group size, and included photo/video coverage is strong value at $194, and it’s built to keep you safe and guided from start to finish.
Skip it if you’re set on filming the bridge yourself, because phones and cameras aren’t allowed there, or if the age/weight/height rules don’t match your group. Also skip it if you’re in the situation where participation isn’t allowed based on the pregnancy guideline.
If you’re the type who likes your thrills organized and supported, this is one of the better “do it once and remember it” Auckland activities.
FAQ
How long is the Auckland Harbour Bridge Climb and Bungy Combo?
The duration is 3 hours.
How much does it cost?
It’s listed at $194 per person.
Is it a small group tour?
Yes. The group is limited to 6 participants.
What’s included in the experience?
You get a fully guided Harbour Bridge climb, the Auckland bungy jump, all safety equipment and a climb suit, exclusive access to the bridge, and a photos and video package. Round-trip transfers from Sky Tower are available upon request (subject to availability).
Do I need transport arranged?
Transport isn’t listed as included by default. It can be included free of charge upon request, subject to availability. Transfers from Sky Tower are specifically mentioned as available if you pre-book that option.
What should I wear or bring?
Wear closed-toe, lace-up enclosed shoes. Comfortable clothing is recommended. The bridge suit and safety gear are provided.
Can I bring a camera or phone on the bridge?
No. Cameras, mobile phones, and binoculars are not permitted on the bridge during the climb.
What are the key age, height, and weight limits?
Minimum age is 10 years, minimum height is 120 cm, minimum weight is 35 kg, and maximum weight is 150 kg. Children 14 and under must be accompanied by an adult. Pregnant women can’t participate past the first trimester. Medical conditions are assessed case-by-case.
More Tours Around Auckland
- Waiheke Island: Ferry & Hop-On Hop-Off Explorer Bus Tickets
★ 4.6 · 3,311 reviews - Hobbiton & Waitomo Caves Guided Day Trip from Auckland incl lunch
★ 5.0 · 2,677 reviews - From Auckland: Hobbiton & Waitomo Caves Day Trip with Lunch
★ 4.9 · 2,505 reviews - Auckland Dolphin and Whale Watching Eco-Safari Cruise
★ 4.5 · 1,790 reviews - Skydive Auckland
★ 5.0 · 1,516 reviews
For a Faster Pulse
- Skydive Auckland
★ 5.0 · 1,516 reviews - Waiheke Island: Zipline and Native Forest Adventure Trip
★ 4.9 · 695 reviews - Auckland: 13000, 16000, or 18000-Foot Tandem Skydive
★ 4.9 · 151 reviews - 2 Hour Surf Lesson – Te Arai Beach
★ 5.0 · 119 reviews - Jet Ski Hire Auckland – Experience the Fun with the Best Operator
★ 5.0 · 62 reviews
Fresh off the boat: newer Auckland tours to browse


Adrenaline & Adventure, compared.
 ★ 5.0Skydive AucklandFrom $2141,516 reviews
 ★ 4.9Waiheke Island: Zipline and Native Forest Adventure TripFrom $89695 reviews
 ★ 5.0Waiheke Island: Zipline And Forest WalkFrom $92483 reviews
 ★ 4.913000, 16000, or 18000-Foot Tandem SkydiveFrom $206151 reviews
 ★ 5.02 Hour Surf Lesson – Te Arai BeachFrom $50119 reviews
 ★ 5.0Waiheke Island Day Tour: Ziplining, Wine Tasting & Vineyard LunchFrom $266106 reviews
 ★ 5.0Jet Ski Hire Auckland – Experience the Fun with the Best OperatorFrom $11162 reviews
 ★ 4.9Group Surfing Lesson with Muriwai Surf SchoolFrom $4134 reviews
Browse the lists this tour appears in